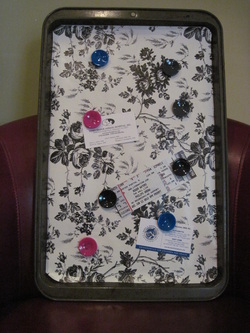
This was the question I was asking myself when a different project failed...I thought I had come up with a great idea to use a metal yard stick tacked up under cabinets or by a desk area to be able to tack papers, etc. via a magnet... only to find out a magnet wouldn't stick to it :( Still love that idea but will need to find some similar metal strip at a hardware store and test it...So after that, I found myself wandering around my house wondering what will my magnet stick to...Here's one answer and project that came out of it. Got any old cookie sheets that are at the end of their lives? Good - now grab a roll of contact paper at the Dollar Store, cut, peel and stick, add magnets and if you are lucky like me and there is a hole at one end of your sheet - you are one hammer and nail away from a new magnet board hung and ready to use! Possibilities are endless! You could spray paint sheet before contact paper, edge sheet with ribbon, tons of ways to disguise and decorate to suit your needs. I LOVE re-purposing things and finding fun/stylish solutions to stay organized. One project may have failed but I like what I came up with on round two!
0 Comments
Somehow it really hit me today that Thanksgiving is just over a week away! It made me think of this cheap and cheerful place setting that I made several years back. Small terracotta pots from the Dollar Store (you know my love for this store!) were sponge/rag painted with gold, crimson red and hunter green paints - also bought on the cheap from local crafts superstore. Becomes a napkin holder or could be done with any painted theme for any party/holiday to hold candy or other goodies at the table. Think painted pink with white polka dots with gumballs for a girls birthday party. Even better if you have kids who'd like a project over the next couple of weeks. Let them paint/sponge away :) I recently went to a jewelry party at a friend's house and noticed the frames/boards that the consultant had from her company to display/stage the items available for sale. It got me thinking...I can make that and it would be great for storing/staging/displaying the items I use most each week. I have a big jewelry case that stores away the things I use less frequently but my other items are usually left on my dresser top at night before putting back on the next day. Well, not any longer :) I picked up the frame for $3 at a flea market, used two coats of white paint, added 5 small hooks, bought a bucks worth of linen to wrap and glue around the back and now I have my finished piece. This can be hung in a closet or behind a door out of the way but is pretty enough to be hung anywhere. I love the possibilities as far as paint colors/fabric combos especially for a younger girls room. This idea is also super for making custom pin up boards as all you'd need is to string ribbon along the fabric within frame so you could pin/clip photos or other items. Could be used above a desk or anywhere in a kids room. Any large wooden frame can be repurposed with 2 coats of paint and transformed into something super. Happy Halloween Everyone! I can hardly believe its been 31 days since I launched my website, FB page and now have the Blog up and running. I am glad everyone has enjoyed the daily tips! I've had a blast creating them and still have lots of things to come! From now on, I'll be updating my blog a couple of times a week and continue to provide ideas to take you through the holiday season. So onto (drum roll please...) TIP #31: Create an Art Gallery at Home...I bet you have lots of wall space in your garage - doing anything with it? How about an Art Gallery of your kids master works. The items come home in droves so how about displaying for a bit and then it's easier to let it go once it's been admited for awhile. My boys loved this when they were younger as we saw the gallery everytime we came and left the house. I loved it since we could brighten up a normally dull spot. Consider this for use in a hallway to a rec room/kids play room or anywhere there is some wall space a bit under utilized but that you can string some yarn or ribbon between two tacks. Then paper clips and the masterpieces are all you need. I also love this for older kids/offices/craft rooms where photos, cards, reciepts, tickets, etc., could be clipped up and kept handy. Got extra fabric laying around from an old project? Or maybe you just want to "go green" or have a craft project for the kids...either/or/all of the above - make gift bags with the fabric! All you need is shown below - supervise kids with iron if the little ones are helping. With hem tape and an iron you can "sew the sides/bottom by ironing fabric while inside out...turn the bag out, cut top with pinking shears for a cute look and to keep fabric from fraying. Add a yarn tie or other ribbon and to match and it's done! Can be done in all sizes and fabric possibilities are ENDLESS! Think of all the fun holiday fabrics and all the paper gift bags you could avoid buying if you went fabric instead! This has got me excited about the holidays just thinking about it :) |
AuthorJen Payne, CPA, Professional Organizer and mom to two boys: Brendan (17) and Ryan (15). Archives
April 2015
Categories
All
|
|